Table of Contents
- Immediate Cleanup Steps for Fresh Dog Urine Accidents
- Signs of Pet Urine Damage in Subfloor
- How to Identify if Urine Has Reached the Subfloor
- Why Rubbing and Scrubbing Make Stains Worse
- Using Bio-Enzymatic Cleaners for Deep Odor Elimination
- Pet Urine Odor Removal: Moisture Extraction and Dehumidification
- Sealing and Protecting the Subfloor from Future Damage
- Professional Carpet Odor Treatment vs. DIY Restoration
- When to Call a Professional Carpet Cleaner
- Frequently Asked Questions
Last Updated: September 23, 2026
Dog urine in your carpet subfloor is one of the worst problems a pet owner can face. The smell lingers and returns because urine has soaked through carpet fibers, padding, and into the subfloor itself, where ammonia crystallization and bacterial growth take root. Store-bought cleaners don’t reach this depth.
This guide explains how to get dog pee out of carpet subfloor using proven methods that actually work. Whether the accident happened yesterday or months ago, you need to understand what’s happening beneath the surface and what your real options are.
Immediate Cleanup Steps for Fresh Dog Urine Accidents
Act fast when you find fresh urine, the first few hours matter. Blot (don’t rub) with paper towels or cloth, pressing firmly until minimal moisture remains. Apply a solution of one part white vinegar to one part water, blot again, then sprinkle baking soda over the spot and let it sit 24 hours before vacuuming. The vinegar neutralizes ammonia and the baking soda absorbs remaining moisture and odor.
Speed matters with fresh accidents. The longer urine sits, the deeper it penetrates the carpet backing and padding. Every hour counts before it reaches the subfloor.
This immediate cleanup won’t solve a deep saturation problem, but it stops fresh accidents from becoming permanent damage.
Signs of Pet Urine Damage in Subfloor
Look for these warning signs that urine has penetrated the padding and subfloor:
- Persistent odor that doesn’t fade after surface cleaning
- Wet spots that reappear in the same location after drying
- Discolored patches on the carpet that seem to come from underneath
- Soft or spongy carpet in the affected area
- Mold or mildew smell mixed with urine odor
- Visible staining on the carpet backing when you lift the edge
The most telling sign is odor that returns within days or weeks of cleaning, indicating urine has reached the subfloor. Surface treatments won’t eliminate it because they don’t address the source.
If you smell ammonia mixed with mold, the subfloor is likely already compromised. Moisture trapped in the padding creates ideal conditions for mold growth, which poses health risks to your family and can cause structural damage over time.
How to Identify if Urine Has Reached the Subfloor
You need to know exactly how deep the damage goes before you decide on a fix.
The simplest method is the blacklight test. Urine fluoresces under ultraviolet light, showing you exactly where contamination exists. Rent or buy a blacklight flashlight, darken the room, and scan the carpet. Any urine, old or new, will glow bright yellow or green.
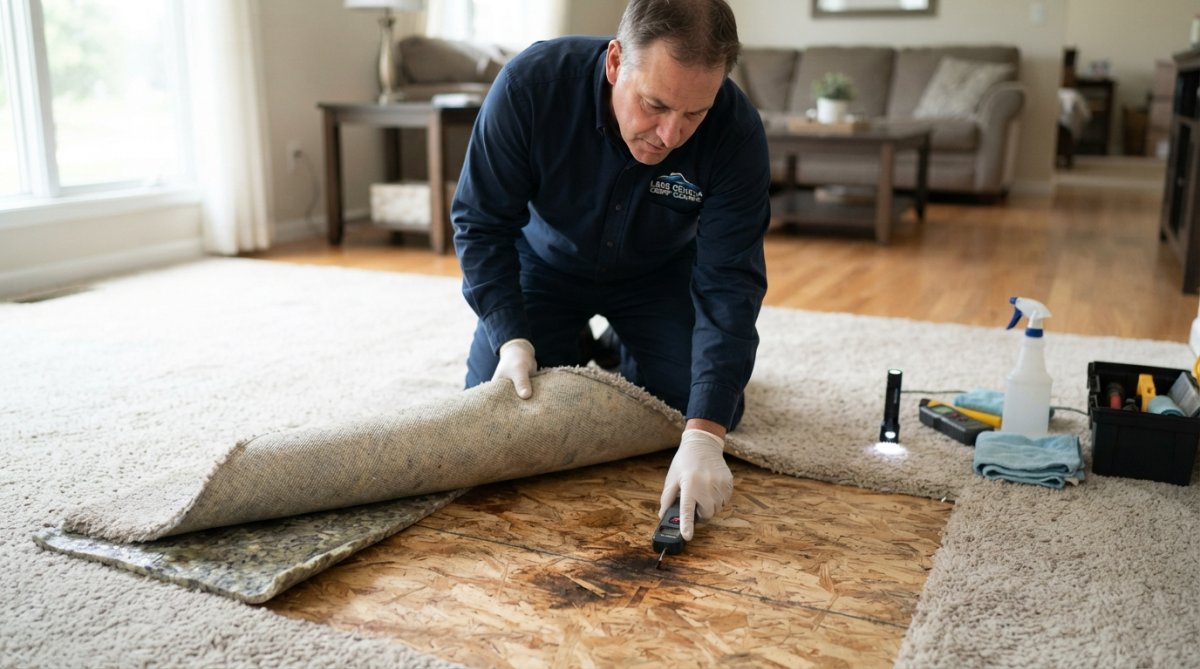
Check the carpet backing by lifting a corner, if it’s wet, discolored, or smells of ammonia, urine has penetrated the padding. Press your hand on the carpet; if it feels damp or spongy hours later, moisture is trapped beneath. Smell at seams and edges; concentrated odor indicates deep penetration. If odor returns within a week or two after cleaning, the subfloor is involved.
A blacklight inspection is your most reliable tool. It shows you the full extent of contamination so you can choose the right removal method instead of guessing.
Why Rubbing and Scrubbing Make Stains Worse
Scrubbing pushes urine deeper into padding and spreads contamination across a wider area. The wicking effect pulls moisture upward, and after drying, urine crystallizes in new locations, creating new odor sources. Aggressive cleaning also breaks down carpet backing and padding faster. The right approach is gentle blotting, press down without rubbing and let solutions sit and do the work. Patience removes urine; force spreads it.
Using Bio-Enzymatic Cleaners for Deep Odor Elimination
Bio-enzymatic cleaners contain live enzymes that break down uric acid crystals and organic compounds in urine, eliminating odor at the source rather than masking it. Apply the cleaner and keep the carpet damp for 24 to 48 hours so enzymes can work. The key is saturation, the cleaner must reach everywhere the urine reached, including padding and subfloor. After the waiting period, blot excess moisture and allow complete drying with proper ventilation and dehumidification to prevent mold growth.
Bio-enzymatic cleaners work best on urine that’s been there for weeks or months. The longer urine sits, the more crystallization occurs, and the more the enzymes have to work with. Fresh accidents may respond to simpler solutions, but old contamination requires enzymatic action.
Many homeowners see partial results with bio-enzymatic products because they don’t achieve deep saturation or they don’t allow enough drying time. The enzymes need both moisture and oxygen to work effectively. Trapped moisture without air circulation limits their effectiveness.
Pet Urine Odor Removal: Moisture Extraction and Dehumidification
Getting moisture out is as important as removing urine. Trapped moisture keeps urine compounds active and creates an environment for mold and mildew growth. How you extract and dry depends heavily on your local climate and humidity levels.
Why Moisture Extraction Matters
Moisture extraction pulls water out of carpet and padding using powerful suction. Without proper extraction, moisture remains trapped in the padding, preventing enzymes from working effectively and reactivating urine compounds. Incomplete extraction is why many DIY attempts fail, the surface feels dry, but moisture is locked in the padding below.
Dehumidification: The Critical Second Step
After extraction, dehumidification removes remaining moisture from air and materials. Open windows only if outdoor humidity is lower than indoor humidity. In warm, humid climates, particularly near the Great Lakes, Gulf Coast, and major river valleys, opening windows makes the problem worse. Air conditioning and dehumidifiers work better than ventilation. Use fans to move moisture-laden air across the damp area, but avoid blowing directly down into the carpet, which pushes moisture deeper.
Climate-Specific Drying Strategies
Drying time varies by location and season. High-humidity regions (Great Lakes, Mississippi River valley, coastal areas) require 48 to 72 hours with continuous dehumidification; mold risk is significantly higher. Moderate-humidity regions (Midwest and Northeast) typically need 24 to 48 hours. Dry climates (Southwest, Great Plains) may dry in 12 to 24 hours, though complete drying still requires attention. Spring and early summer bring higher humidity across most of the U.S., extending drying times and increasing mold risk.
The Mold Risk During Drying
Mold grows in damp, warm environments. If carpet and padding remain damp for more than 48 hours, mold spores will colonize, creating health risks and accelerating structural damage. To prevent mold: keep the area dry within 48 hours, use continuous dehumidification (not just fans), ensure adequate air circulation, monitor for musty smells or dark spots, and call a professional immediately if mold appears.
Professional-Grade vs. Household Equipment
Household wet vacuums extract surface moisture but miss deeper saturation in padding and at the subfloor. Professional truck-mounted hot water extraction systems inject hot water deep into carpet and padding, then extract with force household equipment can’t match, removing moisture from all layers. Commercial dehumidifiers and air movers are also more powerful and handle high-humidity environments better. For small, fresh accidents in low-humidity climates, household equipment may suffice. For deep saturation, large areas, or high-humidity regions, professional equipment is necessary for complete drying within 48 hours.
In humid climates, don’t wait to see if DIY drying works. Start dehumidification immediately after extraction. The first 24 hours are critical. If the area isn’t noticeably drier after 24 hours, professional equipment is necessary to prevent mold growth.
Incomplete drying is the #1 reason odor returns after treatment. Even if the surface feels dry, moisture trapped in the padding will reactivate urine compounds and encourage mold growth. In high-humidity climates, this happens within days. Proper dehumidification is not optional, it’s essential.
Sealing and Protecting the Subfloor from Future Damage
Once you’ve removed the urine and dried everything completely, sealing the subfloor prevents future odor and protects it from moisture damage. The sealing method depends on your subfloor material and the extent of existing damage.
Identifying Your Subfloor Material
Before you seal, you need to know what you’re sealing. Most residential subfloors in the United States are one of three types:
- Plywood (most common in homes built after 1970): Solid wood sheets that absorb moisture readily. Urine penetration causes swelling, soft spots, and eventual rot if not sealed properly.
- OSB (oriented strand board): Compressed wood particles bonded with resin. OSB is more porous than plywood and absorbs urine faster. Once saturated, it loses structural integrity quickly and is harder to restore.
- Concrete: Found in basements and some slab-on-grade homes. Concrete is porous and wicks moisture upward. Urine salts crystallize in the concrete surface, and sealing must account for moisture vapor transmission.
Lift the carpet edge or corner in the affected area and look at the subfloor directly. Plywood shows distinct wood grain and layers. OSB looks like compressed wood chips. Concrete is gray and hard. Knowing which one you have determines your next step.
Assessing Structural Damage Before Sealing
Don’t seal over damage. If the subfloor is compromised, sealing traps moisture and accelerates deterioration.
Press firmly on the subfloor with a screwdriver or awl. If it sinks in easily or the wood feels soft and spongy, the structural integrity is already compromised. This is especially common with plywood and OSB that have been saturated for weeks or months. Urine breaks down the wood binders, turning solid material into pulp.
Look for:
- Soft or spongy spots that yield to pressure
- Visible discoloration or dark staining that indicates deep moisture penetration
- Warping or cupping where the subfloor surface is no longer flat
- Mold or mildew growth on the subfloor surface or edges
If you find structural damage, the affected section of subfloor needs replacement, not sealing. Sealing a damaged subfloor is a temporary fix that will fail. The damaged area must be cut out and replaced with new material of the same type. This is a situation where professional assessment is critical, structural damage affects the safety and value of your home.
Sealing Plywood Subfloors
For plywood that is structurally sound, use a shellac-based primer or polyurethane sealer. These products seal the wood grain and create a moisture barrier that prevents ammonia and urine compounds from rising back up through new carpet.
Clean the subfloor thoroughly first. Use a shop vacuum to remove all debris, dust, and dried urine crystals. A blacklight will show you any remaining contamination that needs attention. Wipe the surface with a damp cloth to remove fine dust, then allow it to dry completely before sealing.
Apply the sealer according to manufacturer instructions. Most shellac primers require one coat; polyurethane sealers may require two coats for full protection. Allow proper drying and curing time, typically 24 hours, before installing new carpet or flooring. Ventilation during curing is essential to prevent ammonia vapors from being trapped under the sealer.
Sealing OSB Subfloors
OSB requires more aggressive sealing because it’s more porous. A single coat of standard primer is often insufficient. Use a moisture-blocking primer designed for porous materials, and plan for two coats to ensure complete coverage.
OSB also has a shorter lifespan once saturated. If the OSB has been wet for more than a few weeks, replacement may be more cost-effective than sealing, since the structural degradation may already be advanced.
Sealing Concrete Subfloors
Concrete requires a different approach. Concrete is porous and wicks moisture from below (from the ground). Sealing the top surface alone won’t stop moisture vapor transmission from underneath.
For concrete, use an epoxy sealer or concrete moisture barrier designed to block both surface contamination and subsurface vapor transmission. These products are thicker and more durable than wood sealers. Apply according to manufacturer instructions, typically in two coats.
If the concrete has visible mold or mildew, clean it first with a dilute bleach solution (1 part bleach to 10 parts water), allow it to dry completely, and then seal. Sealing over mold will trap it and allow it to continue growing underneath.
Climate Considerations for Sealing Success
In humid climates, common in regions near the Great Lakes and along the Mississippi River, moisture vapor transmission through concrete and wood is a year-round challenge. Sealing alone may not be enough. After sealing, consider installing a vapor barrier under new carpet or flooring to prevent ground moisture from reactivating odors.
In drier climates, sealing is more effective because humidity levels are lower and moisture doesn’t accumulate as readily.
Sealing the subfloor is your insurance policy, but only if the subfloor is structurally sound. Assess the damage first, choose the sealer appropriate for your subfloor material, and account for your local climate. Sealing over structural damage or in high-humidity environments without additional vapor barriers will fail.
Professional Carpet Odor Treatment vs. DIY Restoration
DIY methods work for fresh, small accidents. For deep saturation, the choice becomes clear.
DIY approaches rely on products you can buy and apply yourself. Blotting, vinegar solutions, baking soda, and enzymatic cleaners are all accessible. They cost less upfront and you control the timing. However, DIY methods have real limits.
Store-bought enzymatic cleaners often don’t penetrate deeply enough. You can’t apply enough saturation to reach contamination that’s soaked through padding into the subfloor. Moisture extraction with a wet vacuum is weaker than professional equipment. Dehumidification with a single home unit takes longer than professional-grade machines. The result is partial success, odor reduces but doesn’t disappear completely, and it often returns.
Professional treatment uses industrial-strength equipment and products. Truck-mounted hot water extraction systems pull moisture out far more effectively than portable wet vacuums. Professional-grade bio-enzymatic cleaners are more concentrated and penetrate deeper. Commercial dehumidifiers and air movers dry large areas much faster. Professional technicians also know how to identify subfloor damage that needs additional treatment.
The real difference is in subfloor saturation. Professional equipment can inject cleaning solutions deep into the padding and even into the subfloor itself, ensuring contamination is addressed at the source. DIY methods treat the surface and hope the solution travels down. Professional methods ensure saturation at every level.
For how to get dog pee out of carpet subfloor when the damage is extensive, professional restoration offers the best chance of permanent odor elimination.
When to Call a Professional Carpet Cleaner
Some situations demand professional help. Knowing when to call saves you time, money, and frustration.
Call a professional if:
- Odor returns after DIY cleaning, This indicates the problem is deeper than surface treatment can reach
- Multiple accidents in the same area, Repeated saturation means the subfloor is likely contaminated
- The carpet is wet or spongy, This signals padding saturation that DIY dehumidification won’t fully resolve
- You see or smell mold, Mold growth requires professional remediation to prevent health risks
- The affected area is large, Professional equipment covers more ground faster and more thoroughly
- You have allergies or health concerns, Professional cleaning removes allergens, dust mites, and bacteria more completely
- The stain is months or years old, Old urine has crystallized deep in the subfloor and needs enzymatic treatment at depth
Professional carpet cleaners in the Lake Geneva area have the equipment and expertise to handle what DIY methods can’t. They use blacklight inspections to identify the full extent of damage. They apply treatments that reach the subfloor. They extract moisture completely and dehumidify properly. They can assess whether the subfloor needs sealing or replacement.
For local homeowners and business owners dealing with stubborn pet odors, professional restoration is often the only solution that works permanently.
Attempting to fix severe subfloor contamination yourself can lead to incomplete odor removal, mold growth, and structural damage.
Dog urine in your subfloor is a serious problem that requires the right approach. Surface cleaning doesn’t work because the contamination goes deep. You need moisture extraction, enzymatic treatment, and proper drying to eliminate odor permanently.
For homeowners and business owners in Wisconsin dealing with persistent pet odors, Lake Geneva Carpet Cleaning has the truck-mounted hot water extraction technology and expertise to handle subfloor restoration. Our team uses state-of-the-art equipment to remove embedded urine, allergens, and odors that DIY methods leave behind. We’ll assess the damage, treat it thoroughly, and restore your carpets to a healthy condition. Contact us for a free quote and discover why Wisconsin homeowners have trusted us for over 32 years.
Frequently Asked Questions
Can dog urine soak through carpet into the subfloor?
Yes. Dog urine penetrates carpet fibers and backing, then saturates the padding underneath. If the accident is not cleaned quickly, urine soaks through the padding and into the subfloor itself, where it crystallizes and creates ammonia odors that return even after surface cleaning. The longer urine sits, the deeper it travels into porous surfaces.
How do you know if dog pee has reached the subfloor?
Signs include persistent odor even after cleaning, wet spots that reappear, visible discoloration on the carpet backing, or a smell that intensifies when the area is wet or humid. A blacklight will reveal urine stains as bright spots. If the subfloor is affected, the odor typically returns within weeks of DIY cleaning because the source remains below the carpet.
Why does the smell of dog pee return after cleaning?
Surface cleaning removes visible stains but not urine that has saturated the padding and subfloor. As humidity increases or the area becomes wet again, ammonia crystals reactivate and the odor returns. This wicking effect means the contamination must be removed from all layers, carpet, backing, padding, and subfloor, for permanent odor elimination.
Is it possible to clean a subfloor without removing the carpet?
Yes, with the right approach. Moisture extraction and bio-enzymatic cleaners can reach below the carpet when applied with deep-cleaning equipment. However, severe saturation may require carpet padding removal to fully decontaminate the subfloor. Professional carpet cleaning with truck-mounted hot water extraction is often more effective than DIY methods at reaching deep layers.